Maple Alps

Recipes

Lime Maple Tofu Fajitas (vegan + gluten free options)

RecipesAmanda Walter | Maple Alps13 Comments

When you think about a busy day you've just had rushing around doing everything under the sun, do you enjoy coming home to cook a meal? I personally do not. During the school year, a typical work day for me is both physically and emotionally draining. Kids are crazy (I do LOVE my job)! If it were at all possible, I would totally hire a chef to come and cook nutritious dinners for me - but alas, my budget does not allow for that (I don't even think I have to double check it to come to that conclusion, hehe!)

Thankfully, there are a few meals I can easily whip up that taste like they were being prepped for hours. These fajitas are one of those meals. It's quick, easy, and nutritious! They are also very versatile and work with just about any leftover in your kitchen. They also taste great the next day for lunch which is a huge bonus for me!

Lime Maple Tofu Fajitas (vegan + gluten free options) | www.maplealps.com

I'm not a Mexican food expert by any means. The very first time I ever made fajitas I was in Austria and decided to take a weekend trip to visit a friend. I wanted to make her dinner, so I threw some peppers, tomatoes and tofu in a pan and whipped up a similar product. Since that day, I've made these, and the recipe changes pretty much every time. I've since omitted the tomatoes from my original mixture, but I love the lime and maple I put in these. I actually have never looked up a fajita recipe, so I don't even honestly know if I can call these fajitas - but I suppose they are. Haha!

The trick is keeping your pan on low heat. It gives the onions a really nice caramelization and flavour. You can seriously add anything to the filling. I've added beans before. I've also done a crumbled TVP instead of tofu. And as I mentioned before, I've added tomatoes - crushed or diced or whatever my heart desired.

Lime Maple Tofu Fajitas (vegan + gluten free options) | www.maplealps.com

For the tofu, I baked it in the oven. It got to soak up some more of the lime and maple and doing it in the oven allowed it to get firmer and chewier. 

Anyhow, I'm glad to share this super quick and easy meal with you - hopefully it makes your work week easier!

Lime Maple Tofu Fajitas (vegan + gluten free options) | www.maplealps.com

Lime Maple Tofu Fajitas

1 large red onion, sliced
1 large red bell pepper, sliced
1 large orange or yellow bell pepper, sliced
1 clove of garlic, minced
1 block extra firm tofu
2 tsp sea salt
2 tsp cumin
1 tsp chili powder
1/4 tsp red pepper flakes
1 lime
3 tsp maple syrup
Splash of olive oil

8 fajita sized tortillas (can get gluten free)

Garnish/Toppings Ideas:
Fresh cilantro
Fresh lime wedges
Fresh avocados/Guac
Lettuce
Diced tomatoes
Sour cream
Cashew cream sauce

1) Preheat the oven to 425 degrees F
2) Press the tofu in a kitchen towel so that you get as much water out as you can and cut it into long strips
3) On a prepared baking pan, lay the tofu and sprinkle with 1 tsp sea salt, 1 tsp maple syrup, a bit of olive oil, and squeeze half a lime. Bake for 15-20 minutes, until nicely browned. Turn off oven and leave them in there until you're ready to add them to the vegetables.
4) To a pan, add a tiny bit of olive oil. On low heat, cool your onion for about 5 minutes until soft. 
5) Next, add the peppers and continue cooking.
6) Add the remaining tsp of salt, the cumin, chilli powder, and red pepper flakes and mix until the vegetables are coated.
7) Drizzle the maple syrup and the other half of the lime over it and add the garlic.
8) Carefully add the tofu, mix, and you are done!


What's your favourite quick dinner recipe?



Chia Peach Frozen Pops (vegan)

RecipesAmanda Walter | Maple Alps23 Comments

Since moving to Michigan, I've appreciated Summer that much more. It seems that the Winter months drag on and on and on and Spring and Summer bring a breath of fresh air. I find myself physically aching for warm weather near the end of a cold spell and longing for warm evenings on the porch or at the beach.

I need to go outside and embrace my Summer! School will be starting before I know it, and soon the Winter will be back, so I need to get my outdoor time in now. I've been enjoying walking, jogging or riding bikes to the lake and walking along the shore. I also love just laying in the backyard or sitting on the porch - the grass is so soft and the sun makes me so happy!

Before I leave though, I'll give you this recipe to help you stay cool.

This post contains affiliate links.

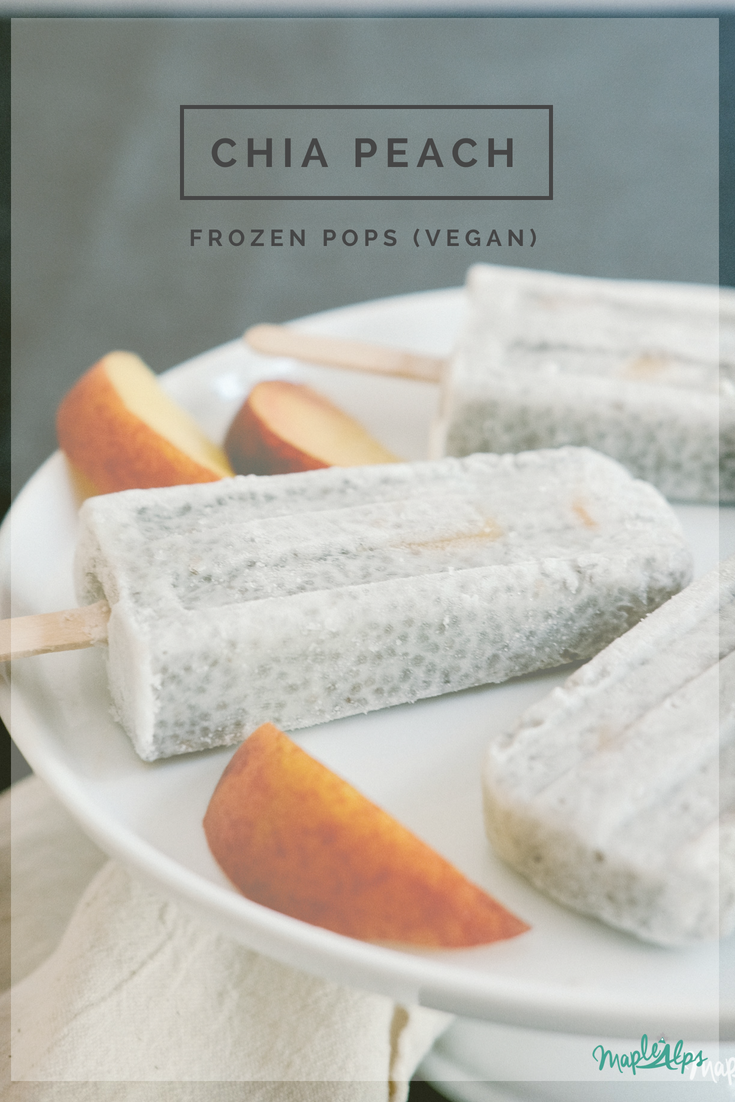
Chia Peach Frozen Pops (vegan) | www.maplealps.com

You all know by now that I like chocolate, and while I have made chocolate versions of these frozen pops (ummm, chocolate peanutbutter chia please!!) and even fudgiscles, I decided to share a non-chocolate frozen treat with you today! I got the inspiration from a smoothie, really, and thought that fruit chunks in a popsicle would be a fun idea. Besides, it makes them prettier in my opinion.

Of course, you can use any kind of fruit in your pops. I chose peaches, because peaches. I love peaches. But I could imagine using raspberries or blueberries, or anything, really!

Chia Peach Frozen Pops (vegan) | www.maplealps.com

Waiting for these babies to freeze is a true test of patience, but they are well worth the wait!

Chia Peach Frozen Pops (vegan) | www.maplealps.com

Chia Peach Frozen Pops

1 ¼ cup coconut milk

½ cup soy

¼ cup chia seeds

½ - 1 TBSP cane sugar (depending on how sweet you want it)

Canned or fresh peach (or any other fruit, really!)


1. Whisk all ingredients except peaches together in a small bowl

2. Let mixture sit for 15-30 minutes, until it has become thick

3. Spoon a bit of the mixture into each popsicle mold.

4. Add fruit as you wish, alternating between the mixture and the fruit

5. Freeze 6 hours, until frozen.

6. To remove, run mold under hot water for 10-15 seconds and pull out carefully. To store, I wrap the pops in parchment paper (separately) and keep them in a freezer bag. You could also get really fancy and grab these plastic sleeves for frozen treats. 


For these treats you may need:


What do you like doing in the Summer months?


Chia Peach Frozen Pops (vegan) | www.maplealps.com

Chocolate Chai Ice Cream (vegan + gluten free + nut free)

RecipesAmanda Walter | Maple Alps18 Comments

Summer is here and I fully intend on enjoying every last second of it! The problem, however, is that summer only lasts a few weeks before Autumn comes creeping along and I have to break out the coats again. I do love the Fall, but I have been waiting and my body has been aching for sunshine that comes right now. The Winter was so long. So, so long. Thankfully, one can still eat ice cream in the Winter. It's just that it can be enjoyed outside in the Summer. 

Chocolate Chai Ice Cream (vegan + gluten free + nut free) | www.maplealps.com

The other day, I decided to break out my ice cream maker. You have to understand that I bought it years ago on a whim because it was a good deal. Since getting it, however, I have used it probably a grand total of….thrice. I was never able to achieve the creamy goodness that comes from the store, so I gave up. And then I had no time to experiment. And then it was in our basement still in the box. So yes, it was really time to either use it or lose it. I decided to try my hand at homemade ice cream again. I tried and tried some more until I finally came up with what I’m sharing with you today: a tasty chocolate chai ice cream.

The best part is that there is no dairy in it! I do love ice cream, but the dairy stuff makes me ill.

Chocolate Chai Ice Cream (vegan + gluten free) | www.maplealps.com

The base is a coconut cream and chai-infused soy milk mix that is pretty tasty if I do say so myself! It’s also creamy and has the right texture. Beyond that, it is inexpensive to make and will save you $5/pint of the dairy-free stuff at the store. You can’t get much better than that, really.

I wasn’t actually planning to make a chai-infused ice cream. I was just brainstorming flavours and I looked over and saw some loose tea that I had picked up a while back and it hit me:

chai + chocolate = seconds, please!

Chocolate Chai Ice Cream (vegan + gluten free) | www.maplealps.com

I already have a ton of ideas for future flavours, so stay tuned as I experiment and develop ice cream-making skills. 

Chocolate Chai Ice Cream (vegan + gluten free) | www.maplealps.com

Chocolate Chai Ice Cream (vegan + gluten free)

What you need:

  • 2 cups soy milk

  • 1 can (15 ounces) coconut cream

  • 1 TBSP chai tea (loose tea or 1-2 tea bags)

  • ⅓ cup arrowroot powder

  • ¼ tsp salt

  • ½ tsp vanilla

  • ¼ cup cocoa powder

  • 2-3 TBSP maple syrup or agave (depending on how sweet you want it)


What to do:

  1. Heat 2 cups of soy milk

  2. Steep the chai tea in the milk for 10-15 minutes, depending on how strong you want the chai flavour (I used a loose-leaf decaffeinated chai from Teavana)

  3. After the tea is done steeping, add it, along with the rest of the ingredients, to a high speed blender. Mix well until there are no clumps

  4. Add mixture to a large saucepan, and heat up slowly, continually stirring, until you have a pudding-like consistency.

  5. Completely cool the mixture (about 4 hours in the refrigerator)

  6. Put into ice cream maker and churn according to instructions

  7. Add ice cream to a shallow container and freeze for a few hours. It will stay creamy for a few days in the freezer- just let it sit out for a few minutes after the first day till it softens a bit!


Have you ever made your own ice cream?


Chocolate Chai Ice Cream (vegan + gluten free) | www.maplealps.com

Creamy Chocolate Ice Pops (vegan + gluten free fudgsicle copycat)

RecipesAmanda Walter | Maple Alps12 Comments

I remember when I was young, my grandparents owned and operated a convenience store in town. In the summer, they would let us have some treats from the freezer and I would always choose a chocolate popsicle. No, this was not a Fudgsicle, but rather a chocolate flavoured popsicle. I don't know if any of you have ever had one, but I loved them.

Then, one day, I did try a Fudgsicle, and I loved it. It was creamy and soft and had so much chocolate goodness - not the watery hardness of my former love. 

Trying to come up with replicating this delicious cold treat has proved quite the task, but I took a cue from my Chocolate Cream Pie and came up with something quite tasty!

This post contains affiliate links

Creamy Chocolate Ice Pops (vegan + gluten free fudgsicle copycat) | www.maplealps.com

Because of the added arrowroot powder, it helped make it much more creamy and gooey, which, in my humble opinion, is the best part about Fudgsicles. It feels just like eating an actual one - the texture is perfect.

Creamy Chocolate Ice Pops | www.maplealps.com

I had some issues getting these babies out of the mould, so they aren't the prettiest, but they sure are tasty!

The best thing about making cold treats is how easy it is to mix things up and come up with fun combinations. I added almond flavour to these pops to add a chocolate almond flavour (my fav!), but you can do whatever you want! I notice that I don't really taste the coconut from the coconut milk when I add flavouring, so I like to skip it sometimes and have a more coconut-chocolate flavour.

Creamy Chocolate Ice Pops

Creamy Chocolate Ice Pops

What you need:

  • 1 cup coconut milk (full fat works best)

  • ¾ cup unsweetend soy milk

  • ¼ cup cane sugar (or less, depending on how sweet you want it)

  • 1 TBSP arrowroot powder

  • 1 ½ TBSP cocoa powder

  • ½ tsp almond extract (if you don't like almond flavour, skip this ingredient, or substitute with vanilla or something fun!)


What to do:

1. In a saucepan, whisk together all ingredients, constantly stirring until thick to avoid clumps. 

2. Pour into popsicle mold (I use this one from Amazon) and freeze for at least 6 hours, or overnight.

3. To remove, run mold under hot water for 10-15 seconds and pull out carefully. To store, I wrap the pops in parchment paper (separately) and keep them in a freezer bag.


**Note: I like making these in small batches when I want to make other flavours as well. For a full tray, simply double the recipe!

 
Staying cool and refreshed is easier now than ever with these tasty vegan fudgsicles!
 
Creamy Vegan Chocolate Ice Pops | www.maplealps.com

Chocolate Dream Pie (vegan + gluten free)

RecipesAmanda Walter | Maple Alps13 Comments

Since marrying my husband, I’ve become a sucker for chocolate. It’s strange because I was never a huge fan of the creamy stuff. I was more into candies that were sour, gummy, and fruity. Alas, turns out the chocolate in Europe really is good stuff. To top it off, chocolate compliments a lot of different flavours, which makes it pretty versatile in my eyes. AND pure cocoa is technically vegan - as long as there is no added milk, etc.. Win, right? 

I remember tasting my first chocolate cream pie. Since I always loved pudding, it was pretty much a dream come true to have crust added to it too (who doesn’t love a good crust?!). I set out to make one of my own that had no heavy whipping cream in it, but still had a creamy, chocolate texture.

Chocolate Cream Pie (vegan + gluten free) | www.maplealps.com

This particular crust came out of sheer need. I didn't feel like wrestling for a flaky crust, and I had some nuts in my freezer and dates in my pantry, so this crust was born. I apologize to those with nut allergies, but you can make the filling with any kind of crust that works for you!

The topping is also DIY optional. I've included a simple recipe below, but if that's not your thing, you do you! I'm constantly switching out things when I cook or bake so I always expect people to do the same. I also know people who stick to the letter of the law when following a recipe, so I've included the steps for each part of the pie below.

Also great about this pie? Aside from the crust, there is no baking required, and is quik to whip up. Just patience while it sets. It makes for the perfect dessert in the summer since it needs to be served cool.

Chocolate Cream Pie (vegan + gluten free) | www.maplealps.com

Chocolate Dream Pie (vegan + gluten free)

What you need:

For the Pie Filling:

  • 1 ¼ cups original almond milk

  • 1 can unsweetened coconut milk

  • ⅓ cup cane sugar

  • Pinch of salt

  • 1 tsp vanilla

  • ¼ cup arrowroot powder

  • ⅓ cup cocoa powder

For the Crust:

  • 1 cup almonds

  • 1 cup walnuts

  • 1TBSP chopped dates

  • 1/2 TBSP maple syrup

  • 2 TBSP vegan butter


For the Whipped Topping*:

  • 1 can coconut milk refrigerated overnight

  • 1 tsp vanilla extract

  • 1 TBSP maple syrup or agave (to sweeten)


Optional:

Extra cocoa powder and toasted coconut for garnishing

What to do:

To make the crust:

1) Prep pie dish by lining with parchment or greasing and preheat oven to 400 degrees F

2) Put nuts and dates into the food processor and pulse until you have a nice meal consistency

3) Add your mixture to a bowl and mix in the maple syrup and butter well until a dough forms

4) Press dough evenly into prepared pie dish

5) Bake for 12 minutes and allow to completely cool before making the filling

To make the filling:

1) Add everything to a large pot.

2) Bring to slow boil, stirring/whisking constantly to avoid burning and clumping

3) Pour into prepared pie crust

4) Refrigerate for several hours (at least 4 hours) to set 

To make the whipped topping:

1) Right before serving, make the whipped topping by opening coconut milk and scooping out the solid part of it into a chilled bowl (be careful not to get much liquid into your bowl).

2) Add vanilla and maple syrup and whip with hand mixer.

3) Apply to pie as desired - spreading it over the top, or adding a dollop to each piece - really, whatever you want :)

* Note: Alternatively, you can use your favourite store-bought vegan topping


Are you a fan of cream pies?